Troubleshooting
Here you can find known issues and their solutions for our product photography solutions and car photo studios. If you find anything else that should be added to this list, feel free to send us an email.
1. Software
- Restart Software
- Restart Camera
- Restart turntable board (note, with older firmware the USB must also be disconnected and not just the power)
- Install latest software version
- Install Visual C++ Redistributable package
https://aka.ms/vs/16/release/vc_redist.x64.exe Overview of all downloads
Disable antivirus/security software. If you do not want to deactivate the security software, you can read in the next topic Antivirus/Security Software, what exceptions must be defined. Especially the real-time protection of Windows Defender often causes problems.
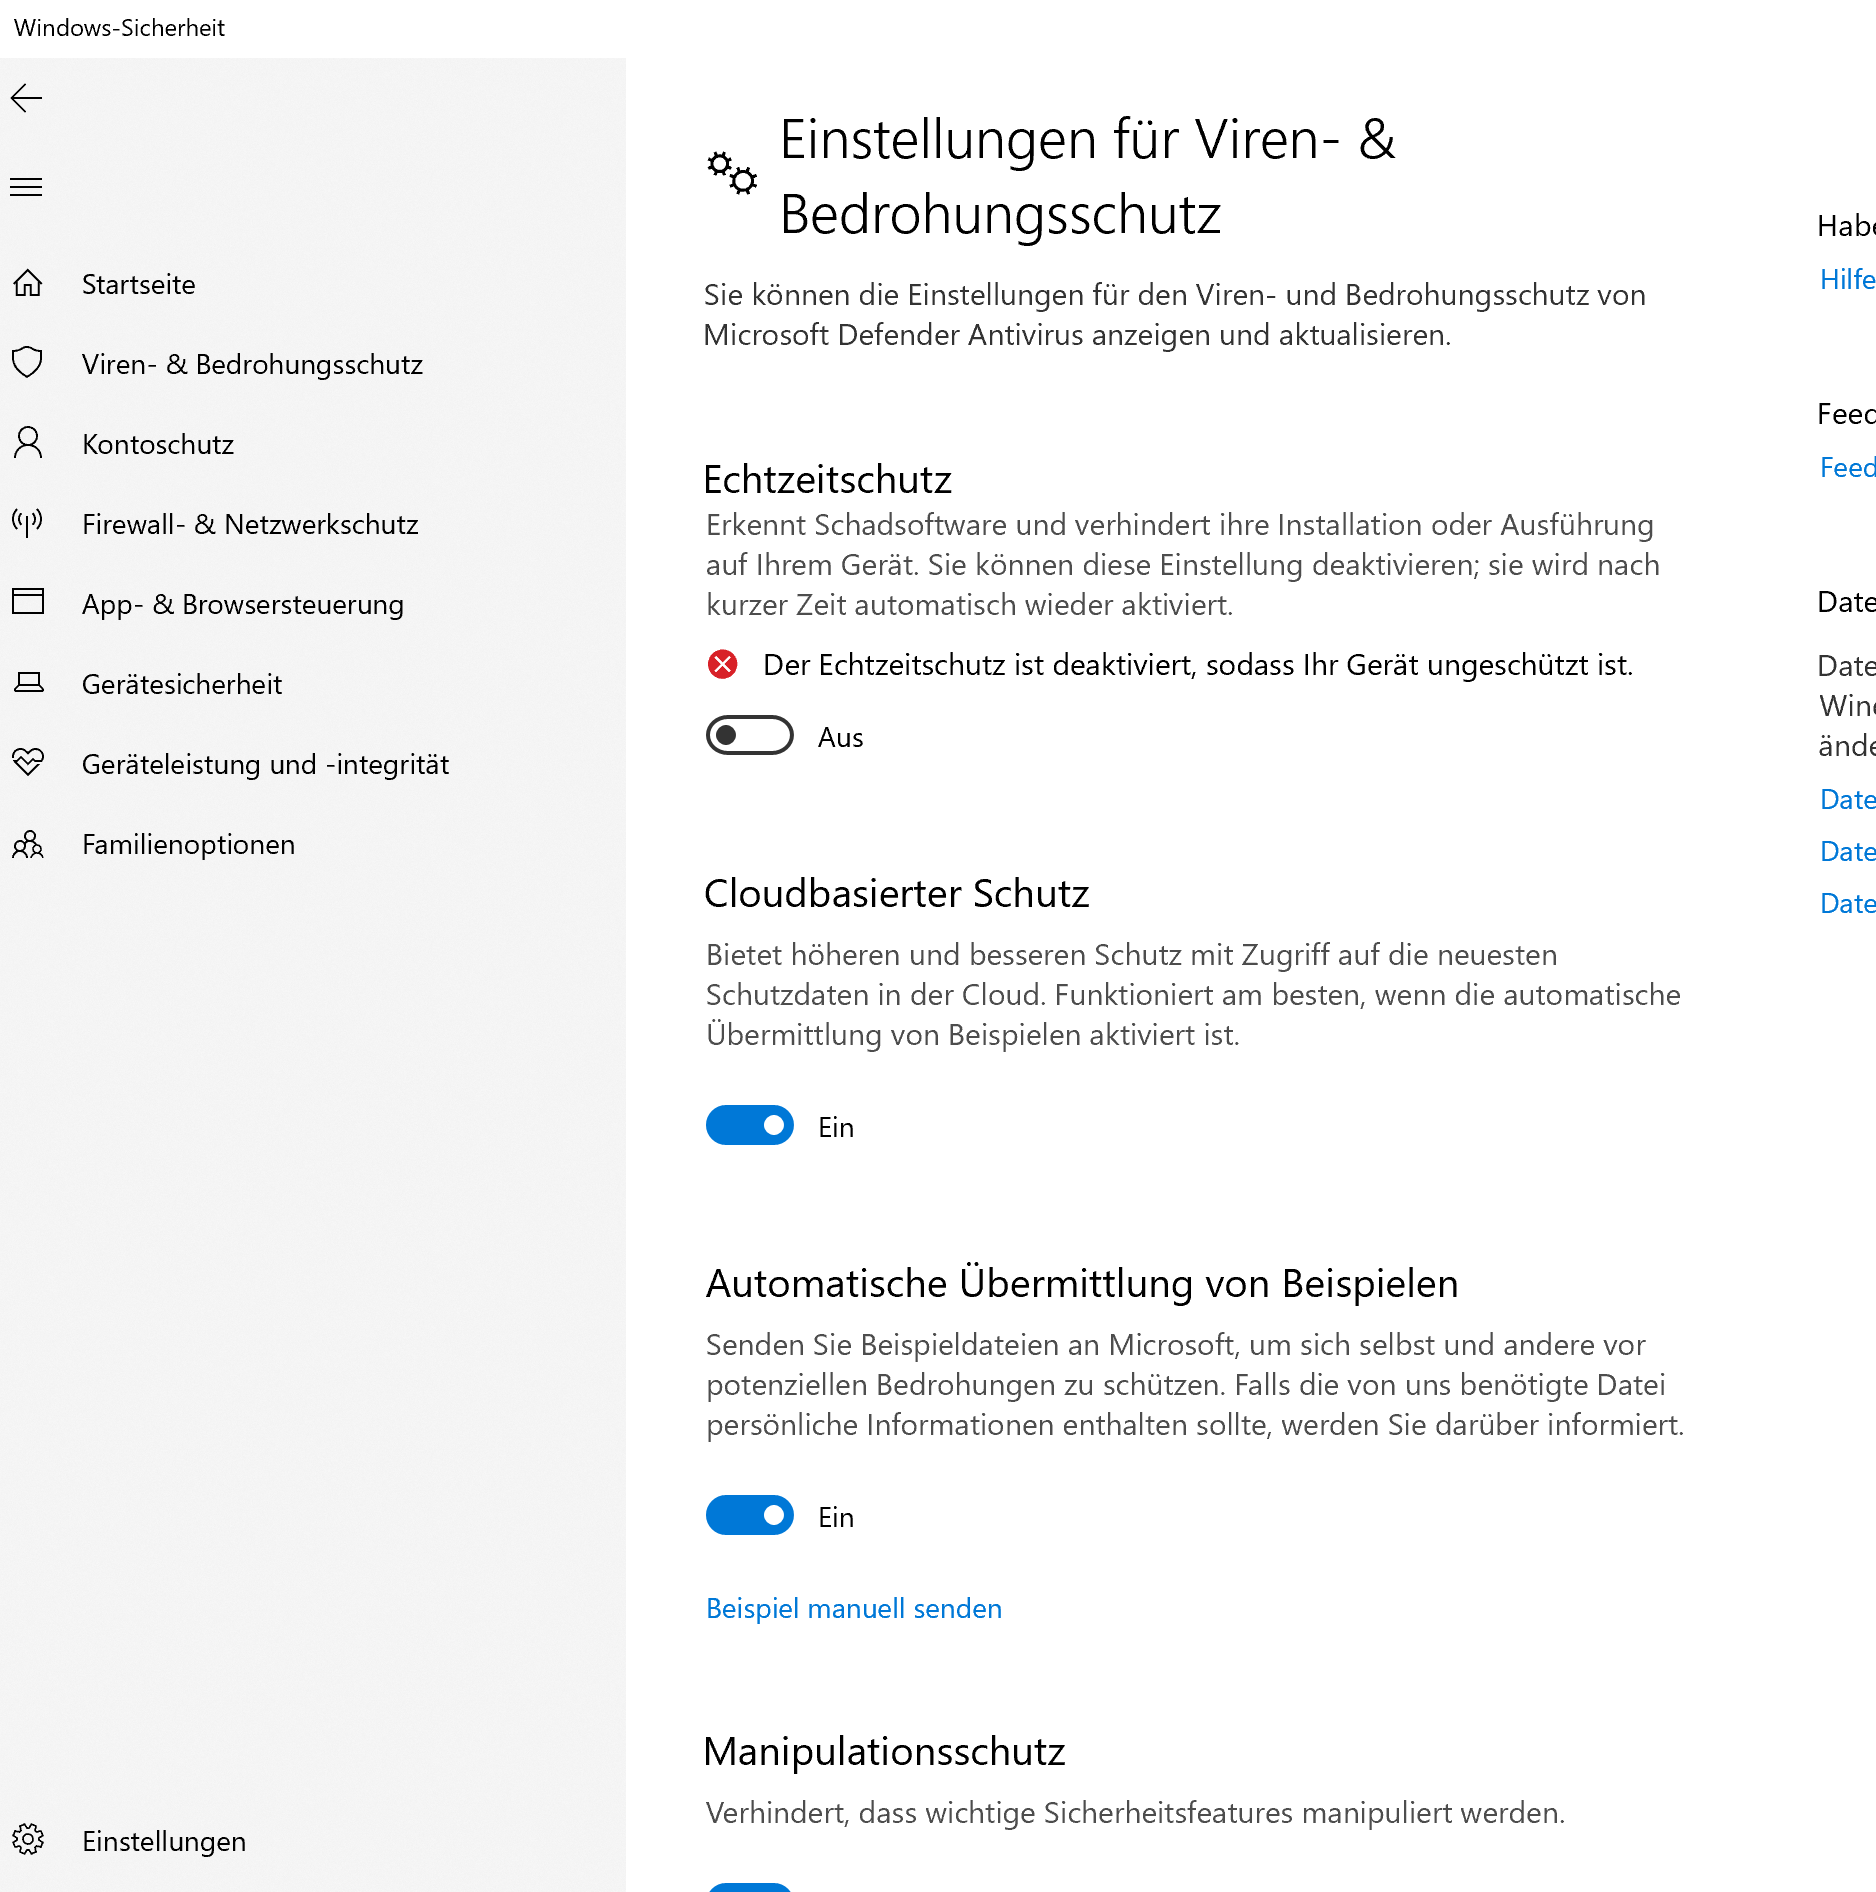
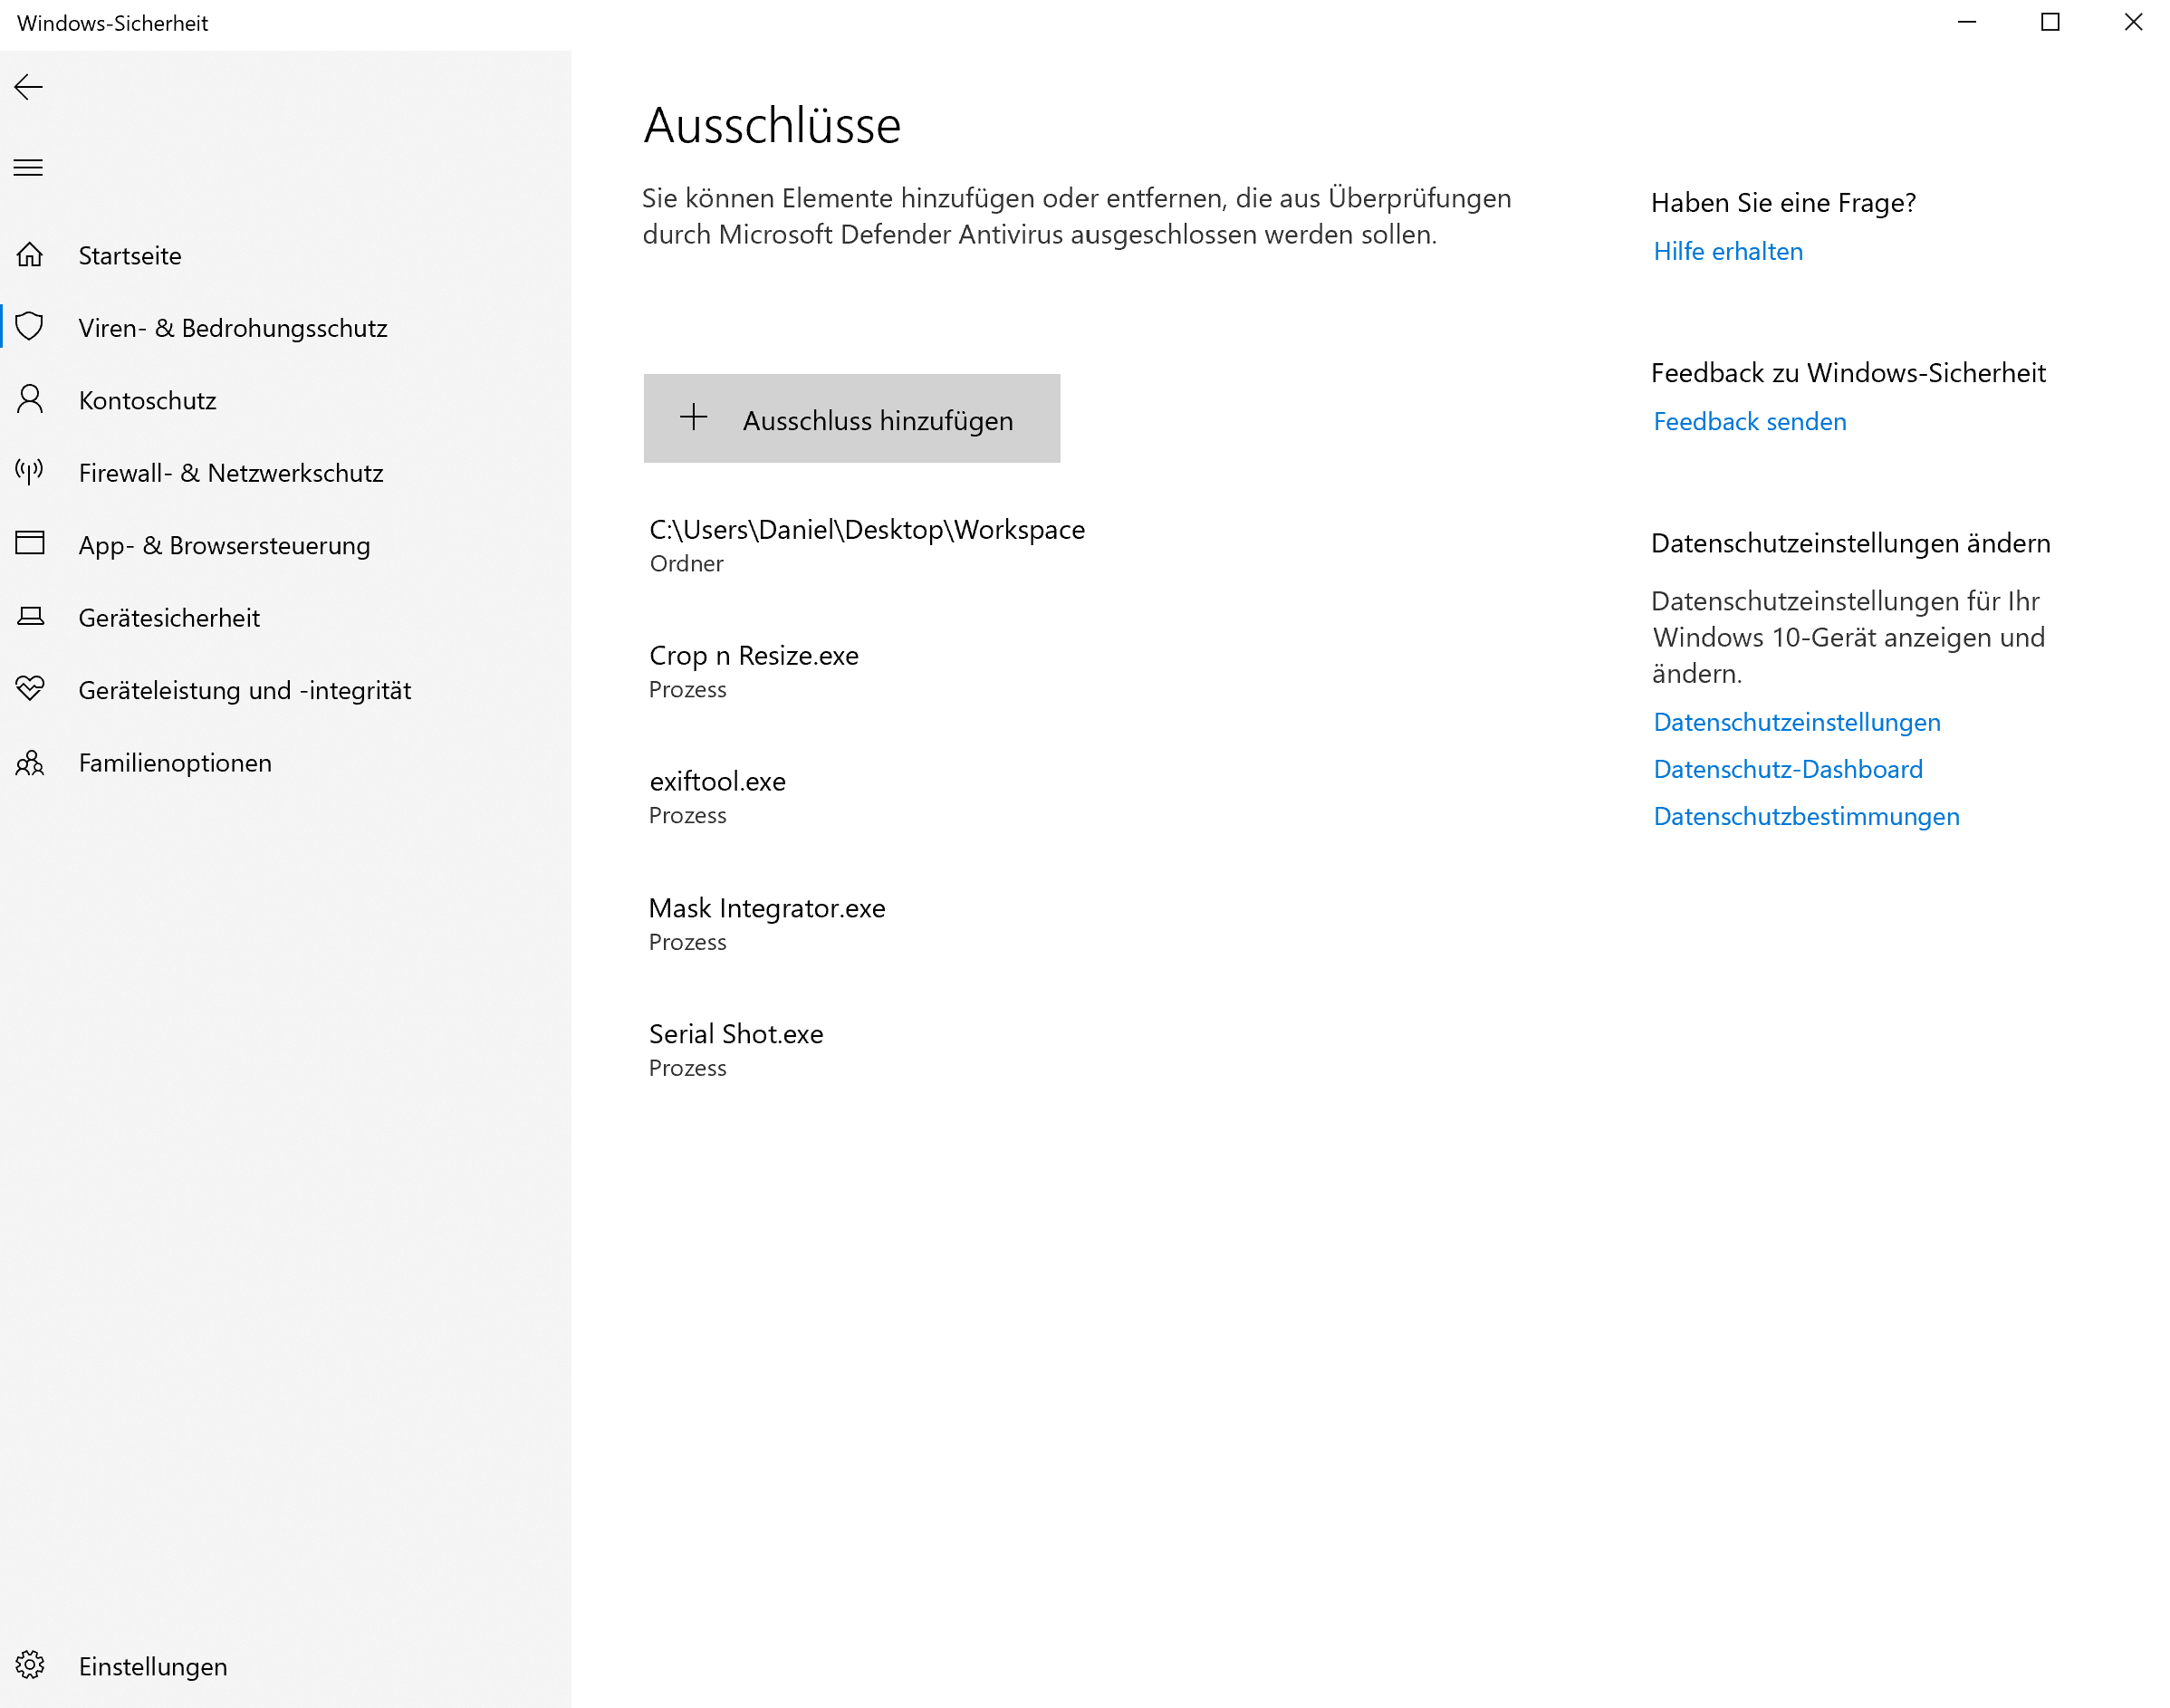
- Exclude program files/exe (Serial Shot, Mask Integrator and Crop and Resize) from virus protection (keyword: Whitelist / Trustlist / Ignorelist)
- In addition, we use a program called Exiftool. This unpacks itself into a temp folder and is executed from there. This is used by all of our programs and is therefore executed multiple times in parallel.
- Serial Shot automatically starts Mask Integrator. That and the communication of the programs with each other, is done via local network sockets.
- Serial Shot dynamically reloads the camera modules at runtime from DLLs in the installation directory (camlibs and iolibs).
- Serial Shot communicates with the device either via Wlan/LAN (network socket) or via USB (COM port)
- If a wifi camera is used, it communicates via network sockets and uses one or more of the following protocols: mDNS, UPNP, SSDP
- Serial Shot and Mask Integrator work alongside their application directories in the workspace folder which you defined in Serial Shot. Crop and Resize also reads from the workspace specified in Serial Shot and in addition writes to program directories specified in the job list
- Here you will find extensive information on which ports and authorizations you need to allow in order for our software to function properly.
- Mostly a bad camera connection is the cause
- Pull USB from camera
- Use USB cable of maximum 10 meter (32 feet)
- Do not use USB extenders
- Do not use USB hubs
- Use shielded USB cable
- Run camera on battery (instead of using continuous power adapter) Most of the time, the continuous power adapter can be used again after one hour of battery operation. It is recommended to turn off continuous power adapter at night).
- Does the behavior change if you disconnect the remote camera release cable on the camera side?
- If the camera is set to Auto Focus or Back Button Auto Focus, does the camera focus correctly? If the camera is not set to release priority, it will not release the shutter if the image is slightly out of focus and will therefore not respond after the release command from Serial Shot.
- Other tethering software (e.g. EOS Utility or Capture One) tries to connect in parallel with the camera -> close other tethering software.
- There is more than 3GB of data on the storage medium
- The storage medium does not contain a DCIM or PRIVATE/M4ROOT folder
- Is there a Serial Shot Preset Bundle (.spb) installed?
- Camera has moved/shifted
- Dirt on the glass
- Dirt on the backlight
- Histogram sliders are set too tight
- Switch off image stabilizer on camera (lens and sensor)
- Camera arm/tripod/stand stable enough?
- Add light from vertically below this shadow
- Set camera to M (manual)
- Turn off auto ISO
- Turn off Dynamic Range corrections, shadow brightening etc.
- External light scatter (e.g. the device is next to a window and the varying light scatter through the window (sun/clouds) add up to the light from the device)
Possibly the function is blocked by an antivirus program (e.g. Windows Defender). If you search for "QFileSystemWatcher" in the log window and there is e.g. "Critical: QFileSystemWatcher: FindNextChangeNotification failed for "C:\Path\Workspace\TempCamera" (access denied)", this is an indication.
If the message "Warning: Exiftool did not supply any data in the last 1000 msec." appears in the log file, it could be because the Serial Shot Workspace is located on a network drive.
No known issues
2. Hardware
- Bad or too long USB cable (camera and/or turntable). Successfully tested up to 10 meters: BlueRigger Active Extension Cable USB 2.0 Type A Male to A Female, Black
- Cables which are certified for the Oculus Rift might also work well for us.
- Slow or inconsistent WiFi (Weak signal?)
- Poor/weak wifi/network
- Is your turntable firmware up to date (you find the version number in the Serial Shot Log)?
- After changing this setting, the turntable controller must be restarted
- FTDI driver installed? https://ftdichip.com/drivers/vcp-drivers/
- Answer: If the reset button on the controller was pressed, the device has the IP 192.168.4.1 again.
- Is the emergency stop switch pressed?
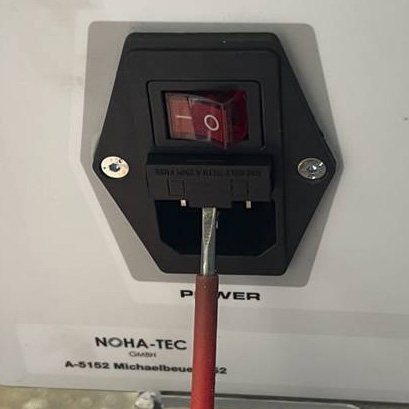
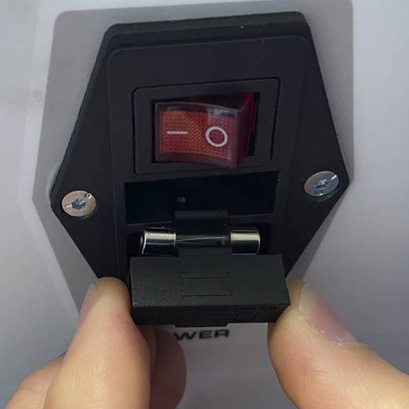
- Please check the fuse (see pictures). It is a 250V 10A microfuse in the size 5 x 20 mm.
- Auto Focus on?
- Other tethering software (e.g. EOS Utility or Capture One) on?
- Focus and shutter speed set too short in Serial Shot Settings?
- Remote release cable connected (possibly loose)?
- Upgrade Camera Firmware
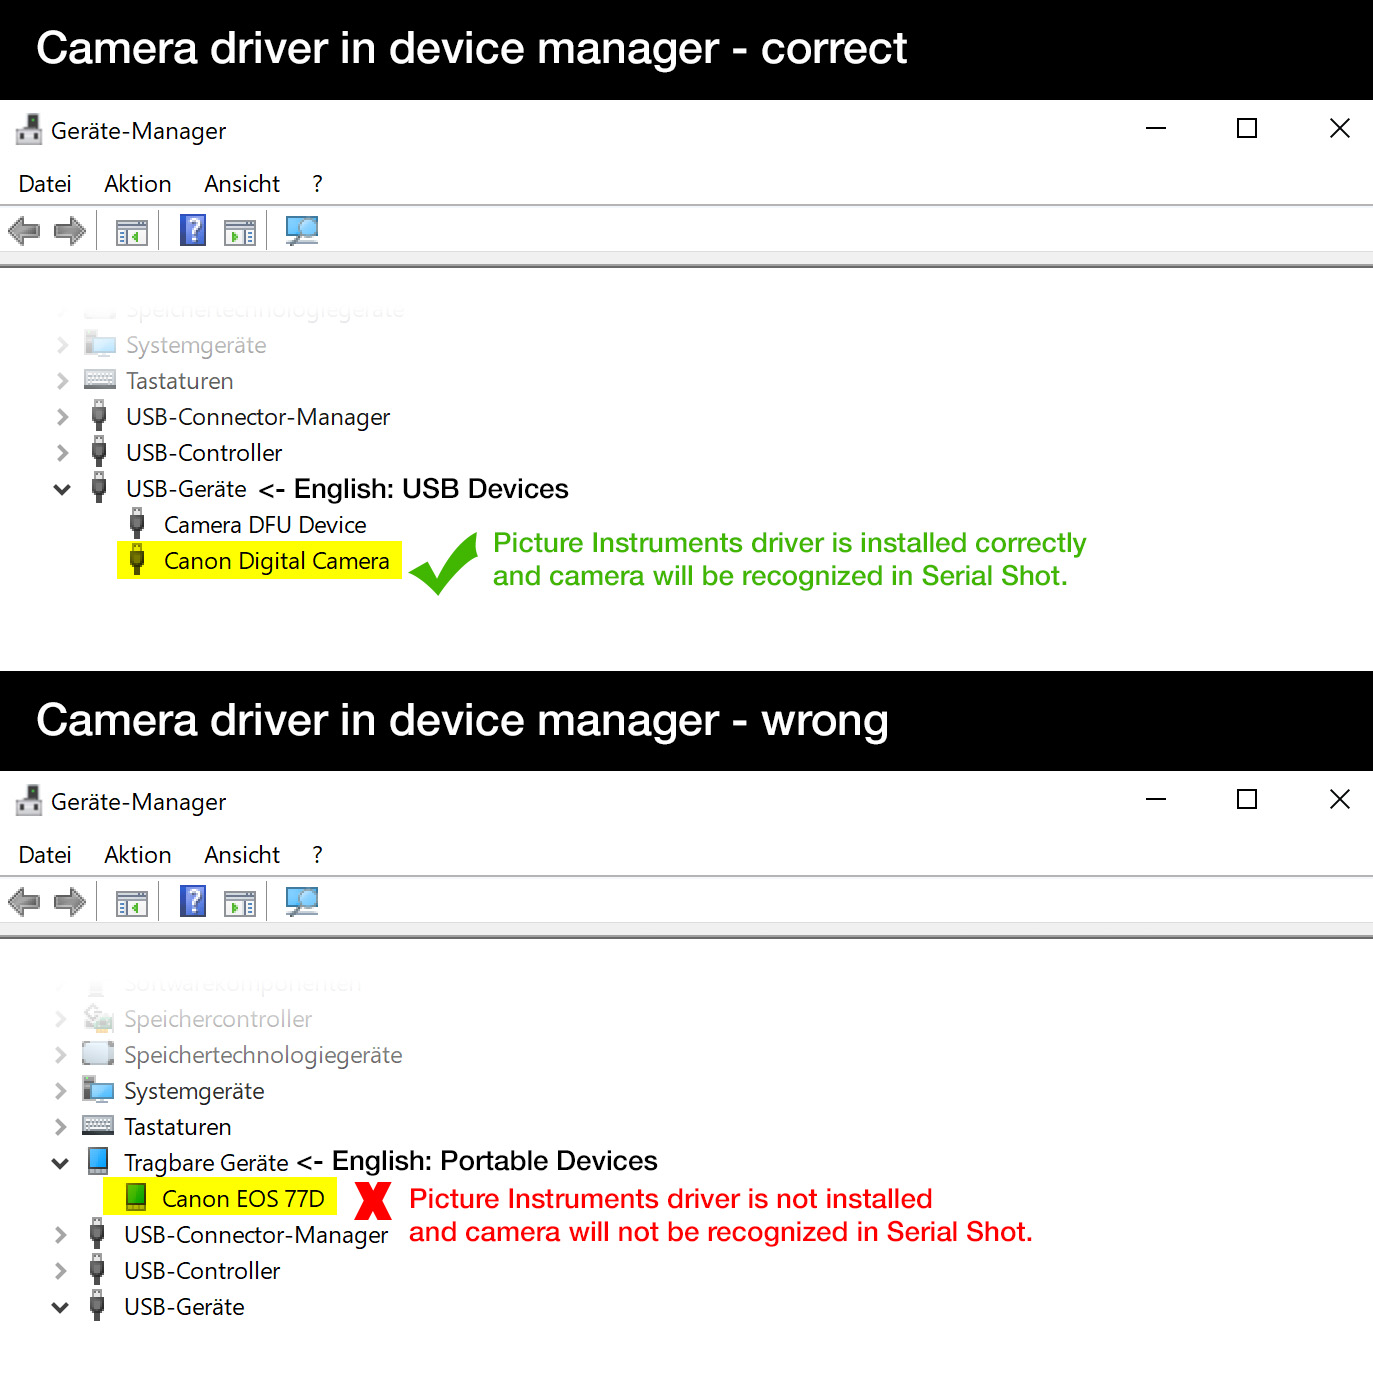
- Camera driver installed (only Windows requires a camera driver)?
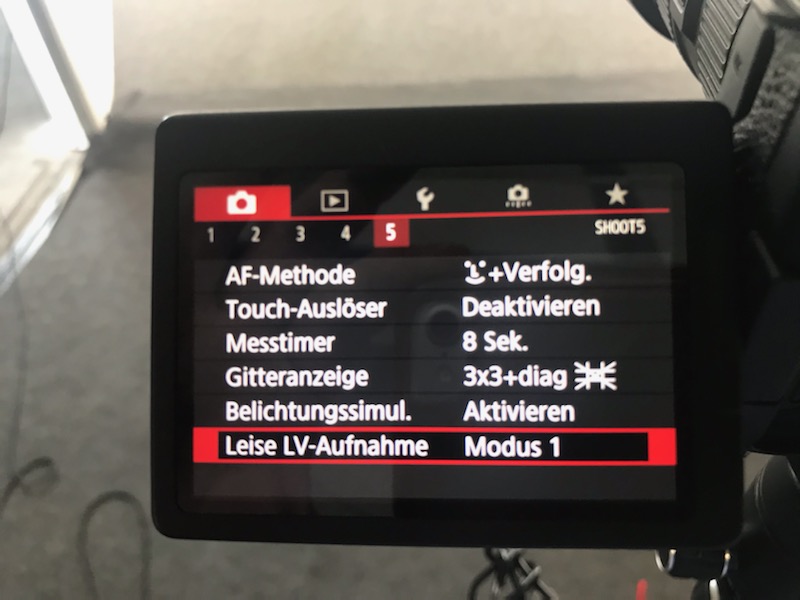
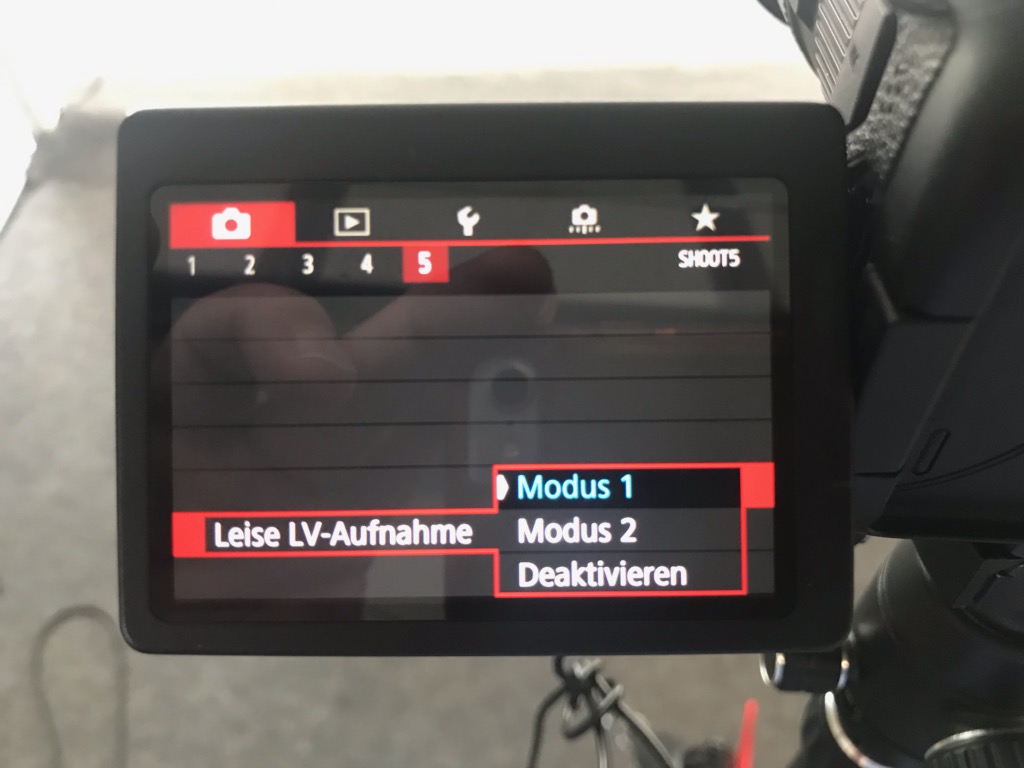
- Menu setting Canon 6D Mk II (ATTENTION! Menu item is only available when Live View is active):
First camera menu, subitem 5, set Quiet LV recording to mode 1
- There are two revisions of the camera, but Canon does not have a Mark II designation for it. You may need to install the driver for the second revision.
- If the review time (image display after the photo) is set to a long time, this could block the shutter release (problem occurred with a 6D MkII in combination with 4 seconds). If necessary also try to deactivate it completely.
- Remove SD card from camera (If images are shot faster than transported away from the camera, the camera may still be busy at the next release attempt and therefore not trigger). Without SD card, the problem occurs only when the internal camera buffer is full.
- Disable power saving mode on the camera
- Check all cable connections on the camera (especially the remote release cable)
- Remove all cables and battery/power adapter from camera for one minute
- Test if the problem also occurs with a battery in the camera instead of a continuous power adapter
- Disconnect the USB cable and insert a memory card into the camera and test if the correct number of images is on the memory card after a 360° rotation
- When there are two memory cards in the camera and it is set to store a backup on the second card
- With the Canon 6D Mk II we had the issue that 2 images are stored when the camera has a manual white balance with green/magenta shift.
- If the computer continues to supply power to the USB (e.g. Bios setting or Windows quick start option) and the camera loses the battery (continuous power adapter), but continues to be supplied via USB, it thinks the battery is empty and jumps into "I am a charger" mode. Then, when the battery power is back, the camera has to be disconnected from the USB once and plugged in again.
- Switch off "Charge via USB" in the camera menu -> Unsure if you also have to switch off the USB standby power supply on the PC.
- Go to Wifi settings

- Enable Wifi

- \

- | Select camera nickname (max 8 chars)

- /

- Select "Remote Control (EOS Utility)"

- Select "Register a device for connection"

- Select "Switch network" to connect to your WiFi network

- \ Select your WiFi network in the list (click refresh if it doesn't show up)

- /

- Enter your WiFi password

- Select "Auto setting" if you are using DHCP (most networks)

- Wait for WiFi connection

- When ready select "OK" to start the pairing process

- When you see this screen Serial Shot can find the camera.

- When you see this screen Serial Shot has found the camera. Click "OK".

- In this screen you can manually disconnect the WiFi connection or select "Confirm set." to see connection details.

- Status screen with WiFi connection active (next to battery level display). The antenna symbol will blink if connection with Serial Shot is lost.

- Firmware update on the camera (helped with the 7D)
- Turn on the camera first, then start Serial Shot.
- Use shielded USB cable
- Upgrade Camera Firmware
- Remove the continuous power adapter from the camera for an hour or more (the camera can be run on battery power during this time). Generally, it is advisable to turn off the camera overnight when not in use so that it does not run for several days at a time.
- Upgrade the firmware on the camera
- There must be a memory card in the camera. This is the only way for the data to be buffered and transferred to Serial Shot using a USB cable.
- Device and computer in the same network?
- Firewall/access rights?
- Correct IP entered?
- Possibly model S or firmware that is too old?
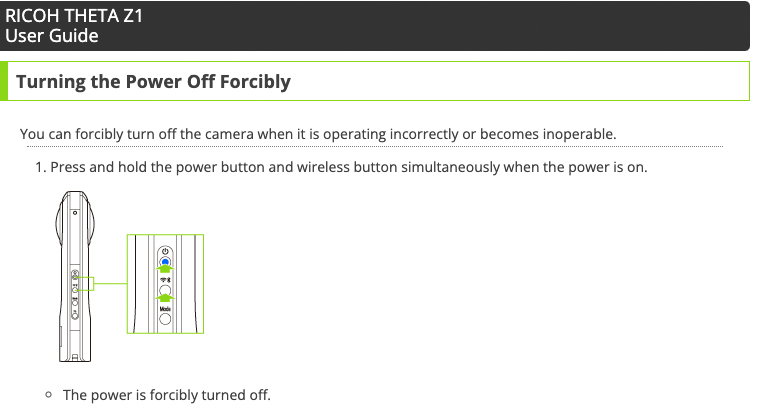
- Switch to “Client Mode” in the Theta X, select your network and enter the Wi-Fi password.
- If you are connected to your network, you can find the IP address of the Ricoh here:
- In Serial Shot, enter the following access data next to the IP in the settings:
User: THETAYR12345678 (everything after the word THETA is at the bottom of the camera)
Password: 12345678 (only the numbers at the bottom of the camera, without the two letters)
Please make sure that there are no spaces in any of the three fields.
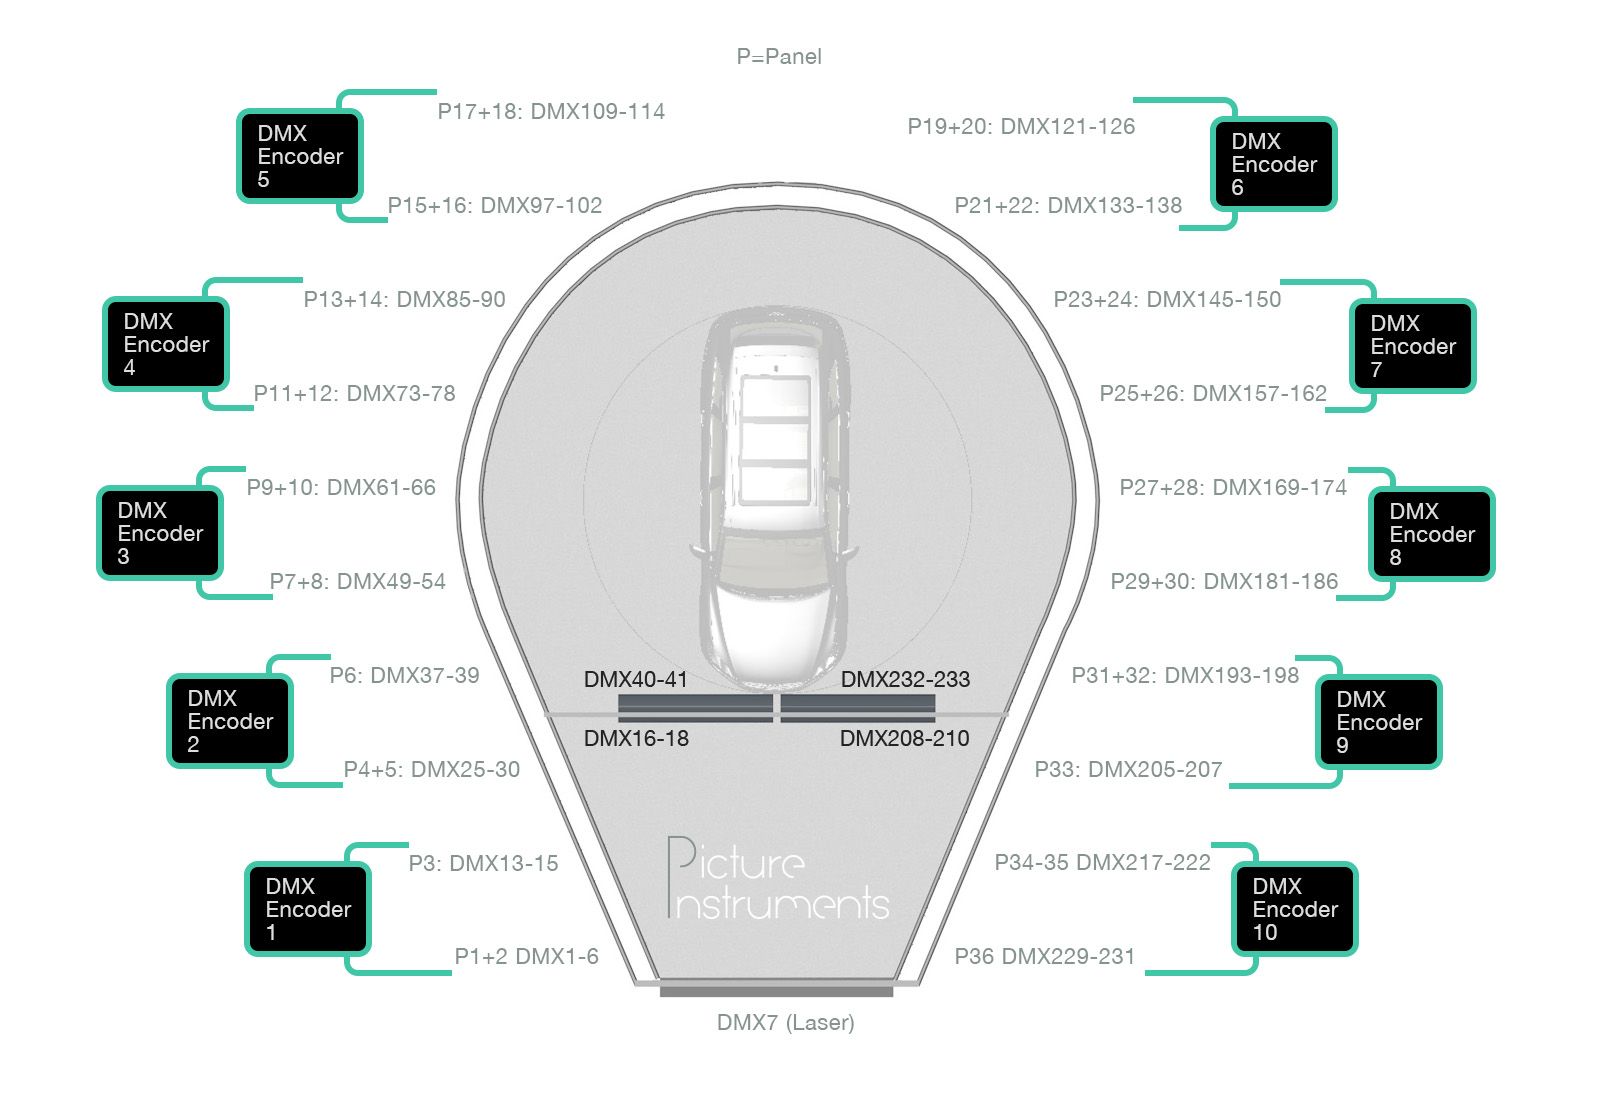
- DMX assignment plan
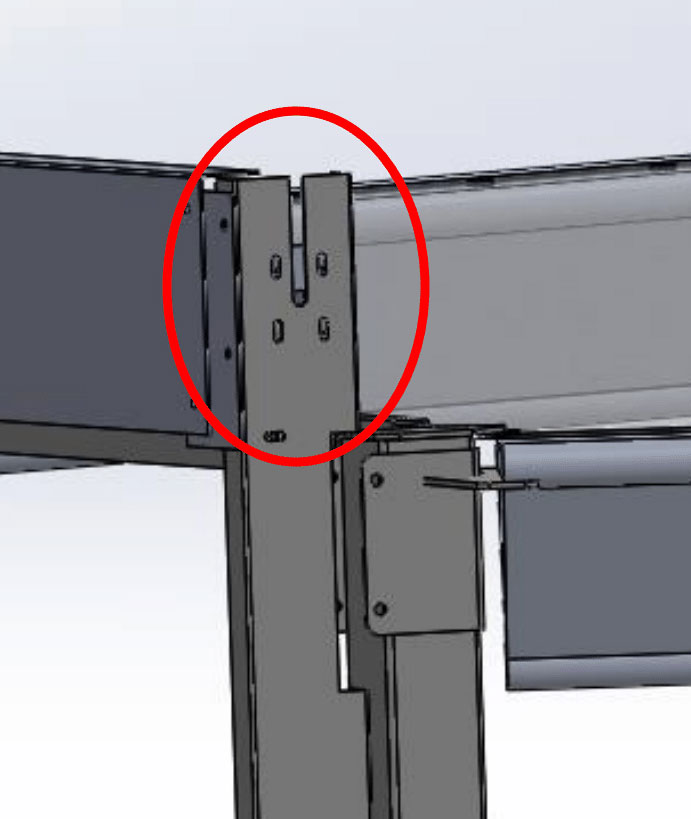 On the right side at the top of the roll-up door there are four adjusting screws (screws not present in the drawing) which fix the plate behind it. On the right side at the top of the roll-up door there are four adjusting screws (screws not present in the drawing) which fix the plate behind it. |
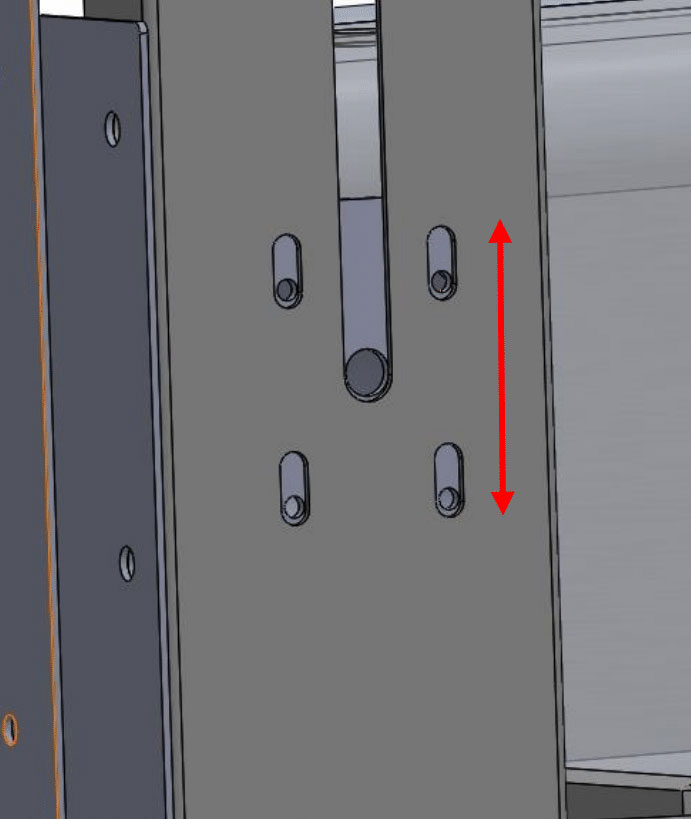 Please loosen these screws and then you can adjust the roll-up door by means of the stainless steel plate behind it. In this case, you would have to push it upwards. Please loosen these screws and then you can adjust the roll-up door by means of the stainless steel plate behind it. In this case, you would have to push it upwards. |
Attention. The rolling gate can be programmed only within the first 2 minutes after it is plugged into the power outlet. If the door is already connected to the power supply, please disconnect the power supply for at least one minute.
- Change / delete the end positions
From a middle hanging position, press both direction buttons (▲ and ▼) simultaneously with the radio transmitter and keep them pressed until the drive briefly moves up and down. - Set upper and lower end position.
- From a middle curtain position, press the [UP▲] button with the radio transmitter until the curtain has reached the desired upper end position. The drive moves off, stops briefly and continues to move (as long as the [ UP ▲] key is pressed). Corrections are possible with the ▲ and ▼ keys.
- Press the [DOWN/CLOSED ▼] key until the drive stops automatically. The upper end position is set.
- Press the [DOWN/CLOSED ▼] button again until the blind has reached the desired lower end position. The drive moves off, stops briefly and continues (as long as the [DOWN/CLOSED ▼] key is pressed). Corrections are possible with the ▲ and ▼ keys.
- Press the [UP ▲] key until the drive stops automatically. The lower end position is set.
- Batteries empty?
- Cleaning with soapy water
- Alcohol must only be used very carefully, as it destroys the coating (dab at most - never scrub hard)

